Deploy your Hashnode blog on a subdirectory serverlessly
If you want to publish your Hashnode Blog on a subdirectory, look no further, here's the ultimate guide to make your deployment a breeze.

Talks about Product Management, Finance, Artificial Intelligence, Engineering, Travel, and other experiences. Have fun reading!
🤠 Why read this really long blog :P
Are you a Hashnode blogger looking to host your blog on a subdomain? Are you interested in serverless computing and how it can help you build scalable and cost-effective solutions? Look no further than Cloudflare Workers! In this post, we'll walk through how to use Cloudflare Workers to host a Hashnode blog on a subdirectory, while taking advantage of the benefits of serverless computing.
If you haven't read about the advantages of subdirectory hosting for your blog yet, check out my previous post in this series.
☁️ What is Serverless Computing?
Serverless computing is a model in which a cloud provider dynamically manages the allocation and provisioning of servers. This means that developers do not need to worry about managing servers or infrastructure, and can instead focus on writing code. With serverless computing, you only pay for what you use, and you don't need to worry about scaling up or down based on user demand.
👷 What are Cloudflare Workers?
Cloudflare Workers are a serverless computing platform that allows developers to write and deploy code that runs on Cloudflare's edge network. This means that the code runs in data centers all around the world, closer to your users, resulting in faster response times and lower latency. Cloudflare Workers are a great option for building serverless applications, as they are highly scalable and cost-effective.
💪 Advantages of Serverless Computing
There are many advantages to using serverless computing, including:
Scalability: Serverless architectures can automatically scale up or down based on user demand, ensuring that your application can handle sudden spikes in traffic.
Cost-effectiveness: Serverless computing can help you save money, as you only pay for what you use. This means that you don't need to worry about paying for idle server time.
Reduced complexity: With serverless computing, you don't need to worry about managing servers or infrastructure, as this is all handled by the cloud provider. This means that you can focus on writing code instead of worrying about server management.
Faster time-to-market: Because you don't need to worry about infrastructure, serverless computing can help you get your applications to market faster.
⚡So why Cloudflare?
Reasons to use Cloudflare for hosting content from a subdomain to a subdirectory:
Cloudflare Workers provide a serverless platform that allows for running code on their network of servers, reducing the need for traditional hosting infrastructure.
Cloudflare's global network allows for fast delivery of content and can cache content at the edge, further improving performance.
Cloudflare Workers support async requests, which can make it easier to handle multiple requests simultaneously and improve performance.
Using a subdomain allows for separating content and improving security, and Cloudflare Workers make it easy to redirect requests from a subdomain to a subdirectory, giving you the best of both worlds.
Alternatives to using Cloudflare:
Traditional hosting solutions may require more maintenance and have higher costs than Cloudflare Workers.
Other serverless platforms, such as AWS Lambda, could provide similar functionality but may have a steeper learning curve and require more setup.
Using a reverse proxy server (with Apache or NGINX for example) could also provide similar functionality, but it may require more setup and maintenance than using Cloudflare Workers.
⚠️ This approach is not officially supported by Hashnode and hence can break at any point if the architecture/page structure changes.
🙋 I'm convinced, show me how to do it.
Awesome, now let's delve into the nitty-gritty of the implementation. Cloudflare workers are really easy to implement. if you're new to this, you can learn more about Workers here and try out the playground here. You can use the Wrangler CLI if you're already comfortable with Worker deployments, else I'd recommend the GUI-based method if you're a beginner, and that's the method I'd follow throughout the rest of this blog.
🕸️ Publish your blog on your custom subdomain
Publishing your blog on a custom subdomain with Hashnode is a pre-requisite to this, but if you haven't done that yet, please follow the detailed steps for the same here. I recommend just setting up the CNAME record to hashnode.network on Cloudflare DNS, and keeping the orange cloud on.
🔑 Verify your domain on Cloudflare
Click on Create Site and add your domain name. So if you're blog is currently at blog.example.com, enter example.com.
Select the Plan, Free works for most use cases, including mine, let's start off with that, thanks to Cloudflare for their generous limits.
Review your nameservers, you'd need to point your nameservers to Cloudflare, step-by-step instructions for which are available here. This can take up to 24 hrs, but usually takes a few minutes.
Ultimately you should see your domain name with a green tick and the word "Active" like this.

👷 Create your Worker
You can create a worker either from Workers > Overview > Create a service from the left pane on your primary dashboard
or
Click on your domain name (example.com) and then go to Workers Routes > Manage Workers> Create a Service.
And now you'd be here:

Give your worker a recognizable name, here I've named it d2s short for subdomain-to-subdirectory, select HTTP router and click Create Service.
Kudos on creating your first worker service. Now we need to add the code.
🪄 Define the data flow and redirect paths
Click on the Quick Edit button to access the Worker code.
The entire worker.js file is hosted on GitHub, and you can just copy the worker.js file and change the hostname from blog.example.com to the domain where you wish to host it.
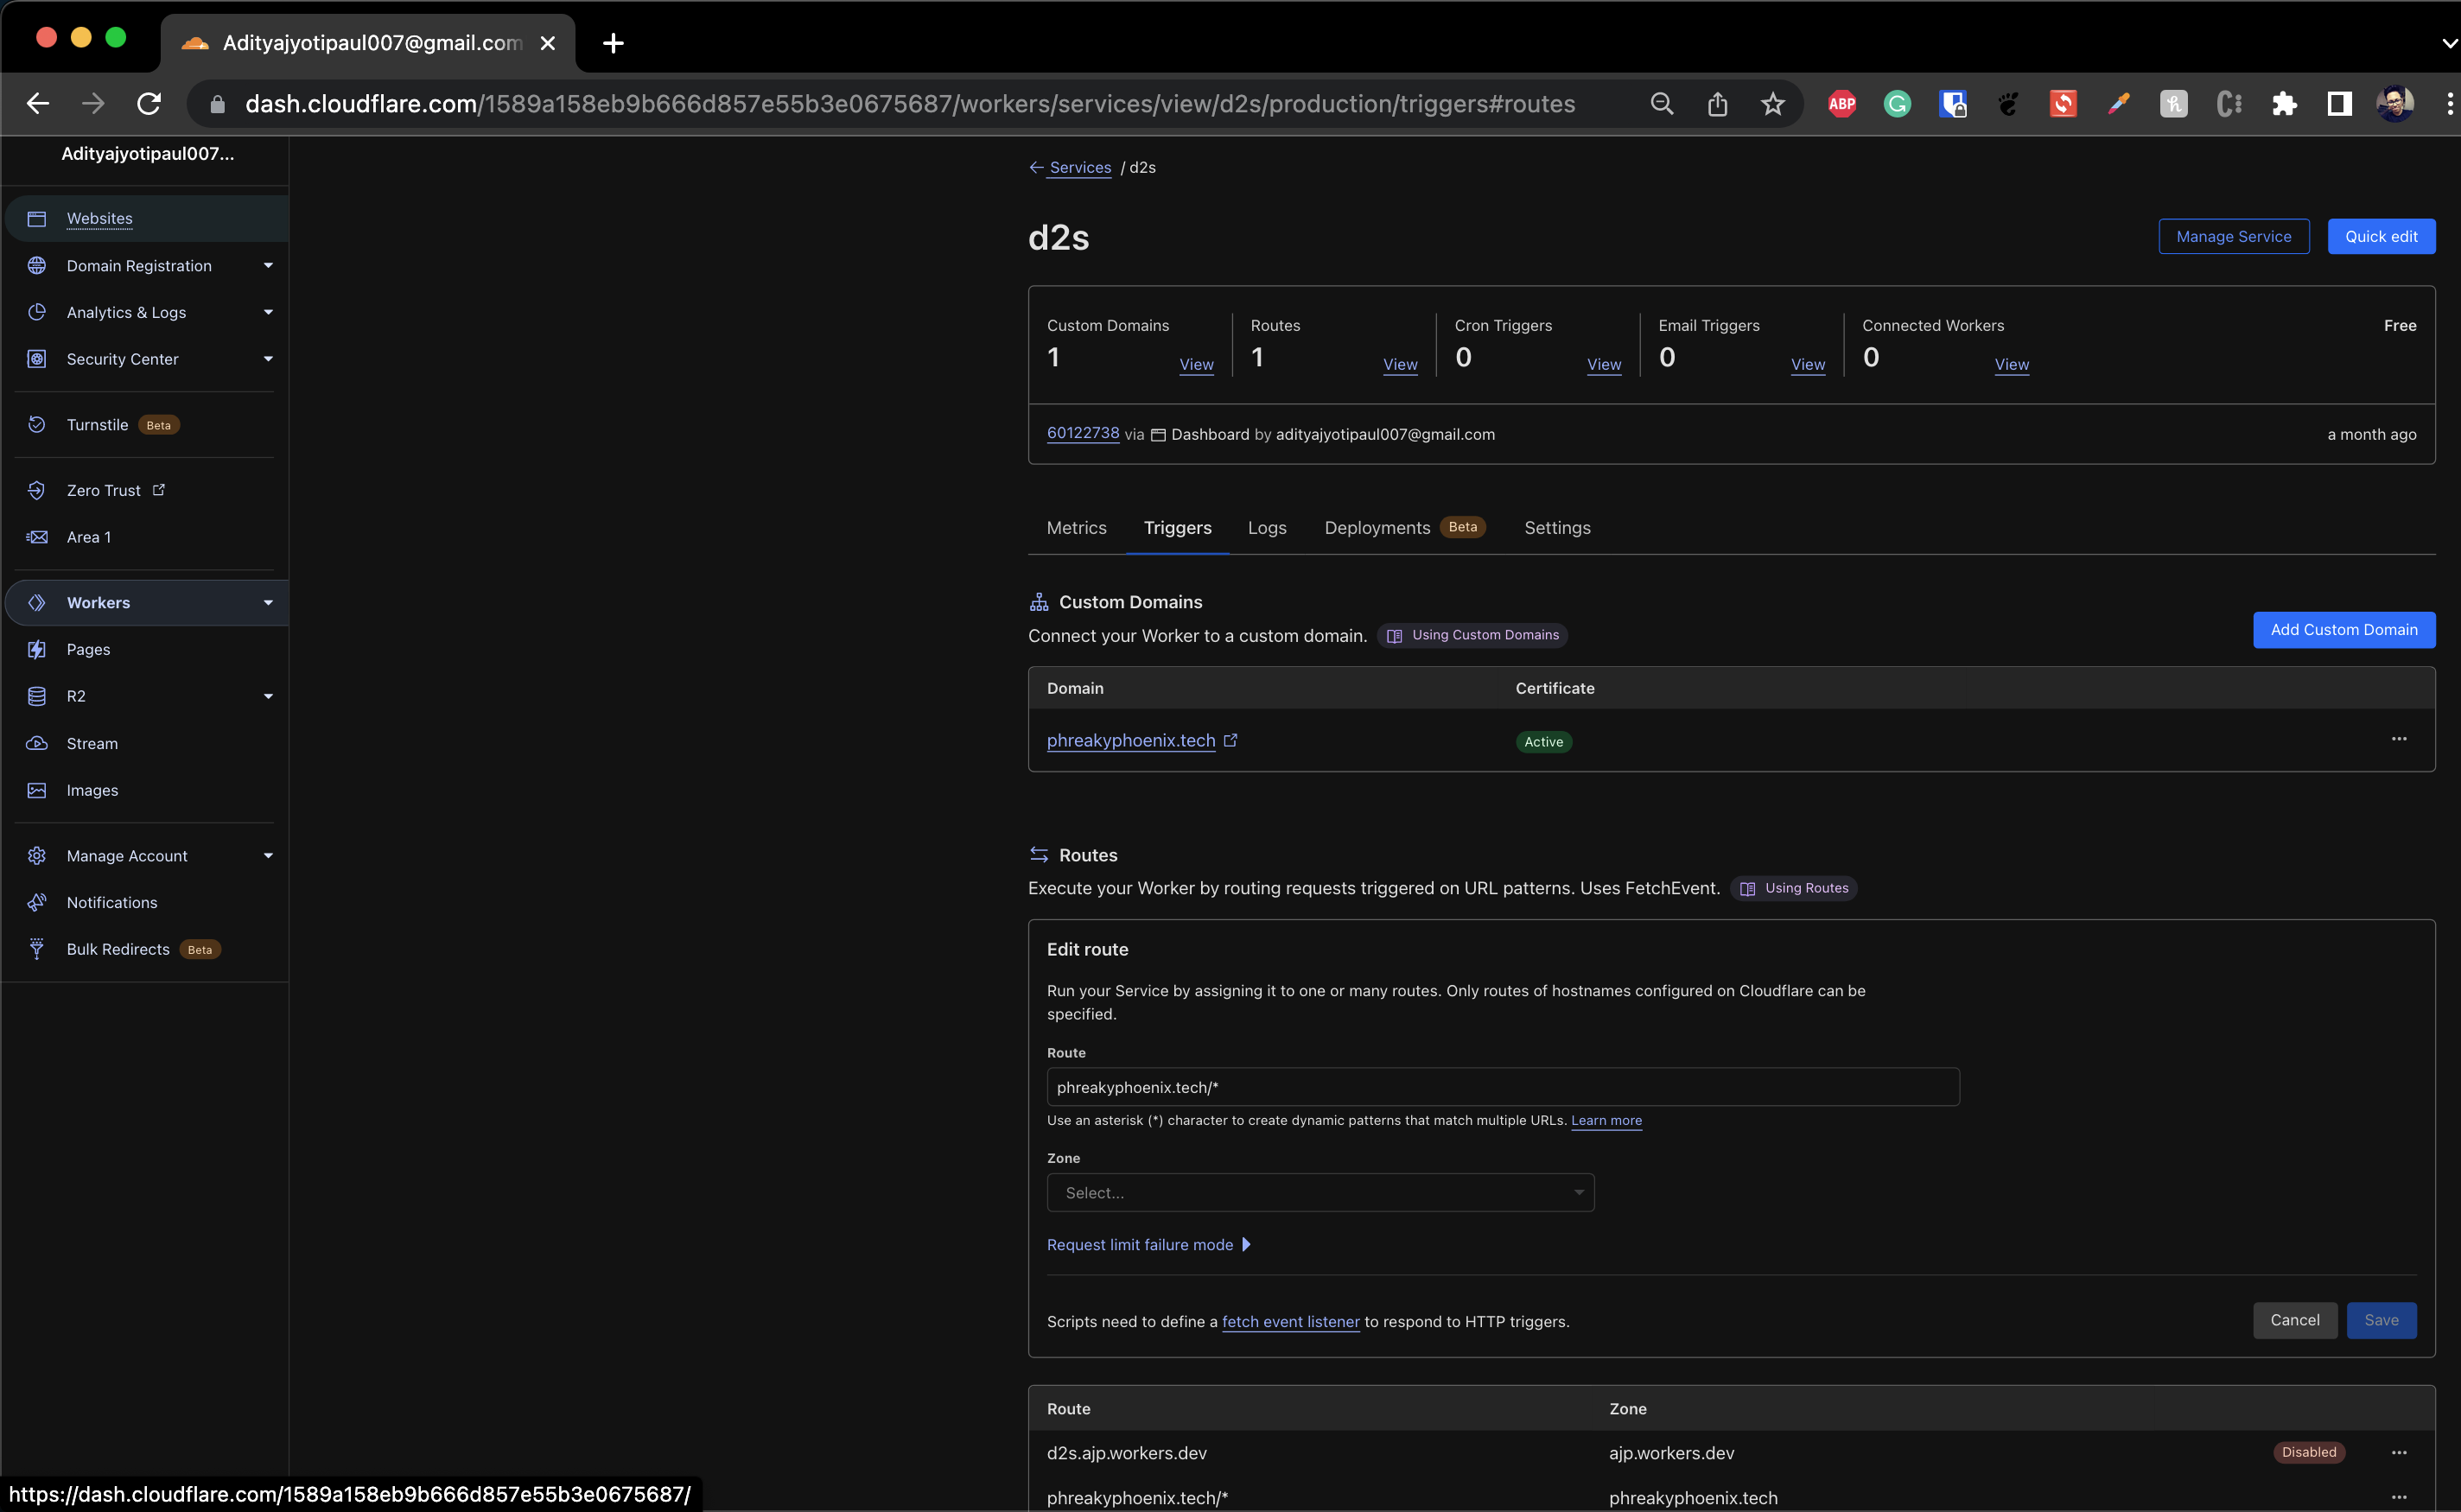
🧭 Set the Routes
Browse over to the Workers tab on the left pane and click on Manage Service, and go to the Routes section. Add example.com/* to Route and your domain the Zone. You may disable the pre-defined routes if you wish, here' my setup as a reference, you should see your active active routes, like you see at the bottom of this image.
🎉 Woohoo!
That's it! Your blog is now successfully deployed to example.com/blog and also accessible via blog.example.com. You can verify a new DNS Worker record is created in your DNS settings as well pointing to the worker you just deployed.
Pat yourself on your back, coz you deserve it and here's a cute panda rejoicing with you!

🧙The Secret Sauce in worker.js
I wanted to save this part for the last so as not to bog you down with code, but if you're a brave adventurer and want to extend the capabilities of your blog, worry not, as I shall explain how the code works and all the interesting nuggets of how I made this work here.
Some helpful references before we begin:
Create Today Demo on deploying a simple site from subdomain to subdirectory.
Cloudflare Blog on SEO best practices and subdirectory implementation
These were the only two resources I could find which inspired my work.
🌎 Defining the global variables
First we'll define our variables like hostname, blog directory and asset pathnames like this.
// keep track of all our blog endpoints here
const myBlog = {
  hostname: "blog.example.com",
  targetSubdirectory: "/blog",
  assetsPathnames: ["/_next/", "/js/", '/api/', '_axiom', '/ping/']
}
📜 Explanations of the code segments
We create a function named handleRequest that handles the routing logic based on the request method along with 2 helper classes AttributeRewriter, ScriptAdder that do an on-the-fly code rewrite for the blog content hosted on the subdirectory. We also create a helper function gatherResponse to return the response body a s a string. We finally add an Event Listener that listens to fetch requests and responds with the result of handleRequest.
Let's understand them one by one.
1. GatherResponse awaits and returns the response body as a string. If the Content-Type is JSON, then it first converts it to a string else just returns the text of the response.
async function gatherResponse(response) {
  const contentType = response.headers.get('content-type') || '';
  if (contentType.includes('application/json')) {
    return JSON.stringify(await response.json());
  }
  return response.text();
}
2. AttributeRewriter class helps rewrite the relative URLs in the HTML content sent by Hashnode to the client so that the subdirectory-hosted site communicates as expected. Without it, requests would be sent to /awesome-blog (since blogs on Hashnode are all on the root directory of the subdomain) instead of /blog/awesome-blog. We want the requests to be sent to the targetSubdirectory /blog instead.
class AttributeRewriter {
  constructor(attributeName) {
    this.attributeName = attributeName;
  }
  element(element) {
    const attribute = element.getAttribute(this.attributeName);
    //add check for targetSubdirectory start for nested scenarios
    if (attribute && !attribute.startsWith('https://'))
    {
      element.setAttribute(this.attributeName, myBlog.targetSubdirectory+attribute);
    }
  }
}

const htmlrewriter = new HTMLRewriter()
  .on('a', new AttributeRewriter('href'))
3. ScriptAdder adds a custom JS script to prepend targetSubdirectory ie. /blog in the browser URL and history for any blog posts that are opened without the targetSubdirectory present. Without this, relative URL refreshes and back and forward flows would break.
class ScriptAdder {
  element(element) {
      element.prepend('<script>function o(){location.href!=a&&(location.replace("'+myBlog.targetSubdirectory+'"+location.pathname),a=location.href)}var a=location.href;setInterval(o,1);</script>',{html: true});
  }
}

const scriptadder = new HTMLRewriter()
  .on('head', new ScriptAdder())
handleRequestchecks if the content is a GET or POST request.POST responses are first fetched from the subdomain-hosted site, and then sent over to the request originating from the subdirectory. Additionally, for /api/collect requests for pageviews, the payload content itself must be modified with the correct URL.
GET requests are handled differently based on whether they're for a blog document, or assets (CSS, JS, etc) and passed along if they're unrelated.
async function handleRequest(request) {
    const parsedUrl = new URL(request.url)
    const requestMatches = match => new RegExp(match).test(parsedUrl.pathname)

    // console.log(request.body)
    if (request.method === 'POST') {
      if (requestMatches("/api/collect")) {
        var post_body = await request.json()
        console.log(post_body)
        var req_url = post_body["payload"]["url"]
        req_url = req_url.split("/")[2];
        post_body["payload"]["url"] = '/'+req_url;
        post_body["payload"]["hostname"] = `${myBlog.hostname}`;

        const mod_req = {
        payload: post_body["payload"],
        type: "pageview",
        };

        console.log(mod_req)
        const response = await fetch(`https://${myBlog.hostname}/${parsedUrl.pathname}`, mod_req);
        const results = await gatherResponse(response);
        return new Response(results, request);
      }
      const response = await fetch(`https://${myBlog.hostname}/${parsedUrl.pathname}`, request);
      const results = await gatherResponse(response);
      return new Response(results, request);
    }

    // else method is GET

    // blog HTML
    if (requestMatches(myBlog.targetSubdirectory)) {
      console.log("this is a request for a blog document", parsedUrl.pathname);

      const pruned = parsedUrl.pathname.split("/").filter(part => part);
      if (parsedUrl.pathname.startsWith(myBlog.targetSubdirectory+'/newsletter')){
        return scriptadder.transform (htmlrewriter.transform(await(fetch(`https://${myBlog.hostname}/${pruned.slice(1).join("/")}`))));
      }
      if (pruned.length==1){
        return scriptadder.transform (htmlrewriter.transform(await(fetch(`https://${myBlog.hostname}`))));
      }
      else{
        return htmlrewriter.transform(await(fetch(`https://${myBlog.hostname}/${pruned.slice(1).join("/")}`)));
      }
    }

    // blog assets
    else if (myBlog.assetsPathnames.some(requestMatches)) {
      console.log("this is a request for other blog assets", parsedUrl.pathname)
      const assetUrl = request.url.replace(parsedUrl.hostname, myBlog.hostname);
      console.log(assetUrl)
      return fetch(assetUrl)
    }

    console.log("this is a request to my root domain", parsedUrl.host, parsedUrl.pathname);
    // unrelated stuff, do nothing
    return fetch(request)
  }
🙌 Conclusion
If you came this far, I congratulate you on trudging boldly to enlightenment, and welcome any contributions and suggestions for this project on my GitHub repo.

Thanks for reading, please show some love and share with your followers on social media. See you in the next article 👋